 Hack the Route Start learning Open app
The idea
Caleb runs the security operations centre (SOC) at Birchwood Clinic. An intrusion on the patient-intake server is contained, and the write-up is three pages of prose nobody can compare to anything. His ask: take the captured evidence and label every move with its MITRE ATT&CK tactic and technique id, so the clinic can see which tactics were used and whether its defences cover them.
Steps
-
A matrix, not a list
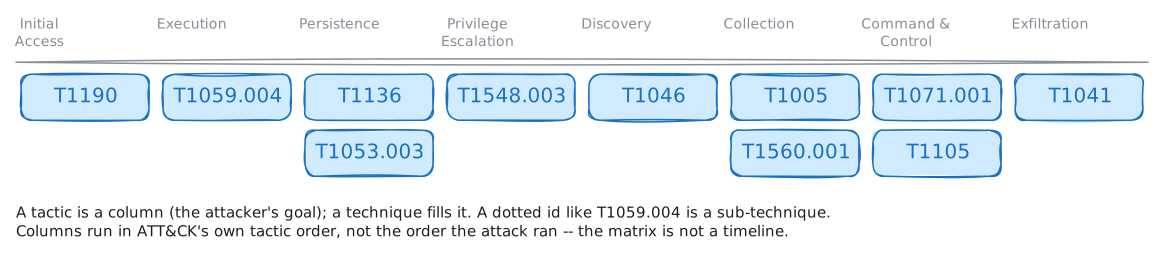
MITRE ATT&CK is a catalogue of what attackers actually do, arranged as a grid. Across the top sit tactics, the attacker's goal at a step: Initial Access, Execution, Privilege Escalation, Persistence, Discovery, Command and Control (C2), Exfiltration, and more. Under each tactic sit techniques, the ways to reach that goal, each with an id like
T1046.A technique can split into sub-techniques, written
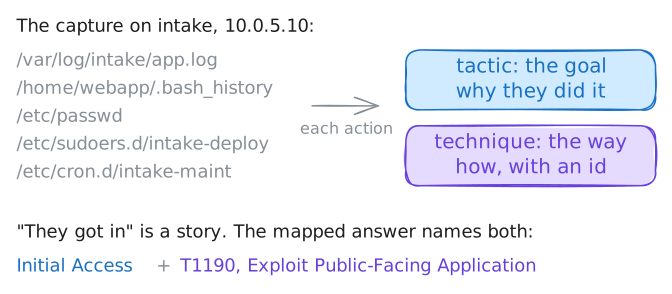
T1059.004: the.004is one specific flavour ofT1059. The split that trips people up is tactic versus technique. "They got in" is not an ATT&CK answer; "Initial Access, by exploiting a public-facing app (T1190)" is.The tactic is the why, the technique is the how, and mapping means naming both for each action. This is not detection: the evidence here is already collected. The job is to put a shared label on each piece so defenders anywhere compare incidents, coverage and tooling in the same words.
Read the capture index Caleb left, then work through the evidence file by file.
intake:~# cat /root/triage/notes.txt
-
How they got on: Initial Access
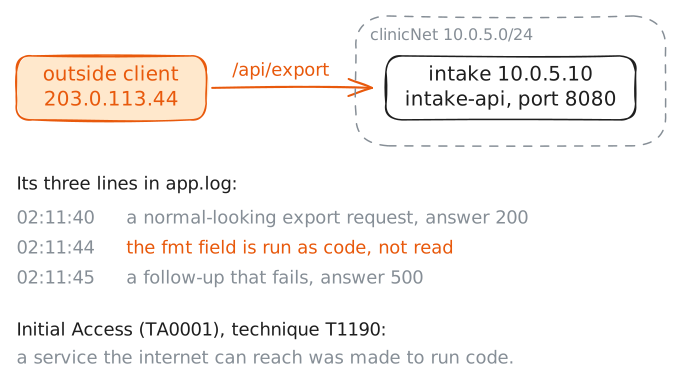
Start where the attacker did. The intake API is reachable from the internet, so the first move is some flaw in that public service. In the matrix that goal is the Initial Access tactic, and exploiting an internet-facing service is the technique Exploit Public-Facing Application,
T1190.The app's own log is the evidence. A normal export request takes a format name; this one put an expression in that field, and the server evaluated it. That is a classic injection into a public, internet-facing path. That one line is the whole foothold: no password guessed, no phishing email, only a reachable service doing what it should never do.
Pull the lines that mention the export path.
intake:~# grep /api/export /var/log/intake/app.log
-
The shell doing the work: Execution
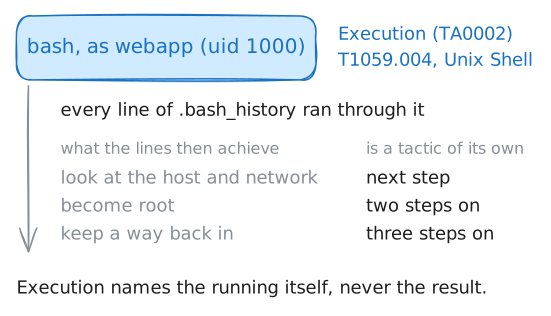
The exploit gave the attacker a way to run one command. What turns that into an intrusion is a real, interactive shell. From here they worked by hand, which the
webappaccount's.bash_historycaught line by line.Running commands through a command interpreter is the Execution tactic. The interpreter here is a Unix shell, so the technique is Command and Scripting Interpreter: Unix Shell,
T1059.004, a sub-technique ofT1059(the.004marks the Unix-shell flavour, as opposed to PowerShell or Python).The session opens with
idanduname -a: the attacker checking who and what they landed as. The account iswebapp(uid 1000 in/etc/passwd), a limited service account, not root. Read the whole history: it is the spine of the rest of this lab.intake:~# cat /home/webapp/.bash_history
-
Looking around the network: Discovery
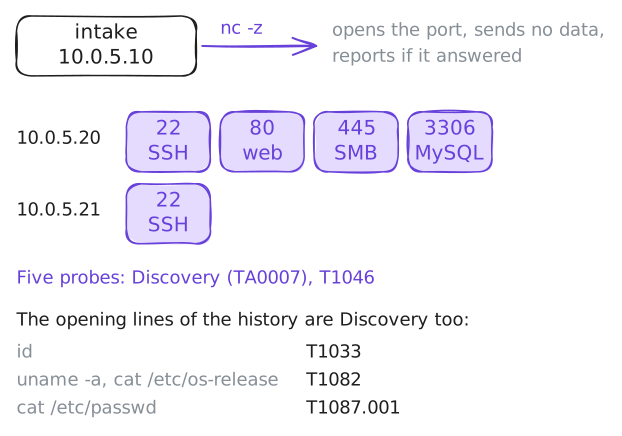
With a shell, the attacker wants to know what else they can reach. The history has a run of
nc -zlines against a couple of inside addresses and a list of ports: a fast check of which services answer. The goal of mapping what is reachable is the Discovery tactic, and probing for listening services across the network is Network Service Discovery,T1046.Discovery is wider than the network scan, though, and a good map names the rest too. The opening lines are Discovery too:
idis System Owner/User Discovery (T1033),uname -aandcat /etc/os-releaseare System Information Discovery (T1082), andcat /etc/passwdis Account Discovery: Local Account (T1087.001).Pull the scanning lines out of the history.
intake:~# grep nc /home/webapp/.bash_history
-
Taking root: Privilege Escalation
Every root-level move that follows (adding an account, writing to
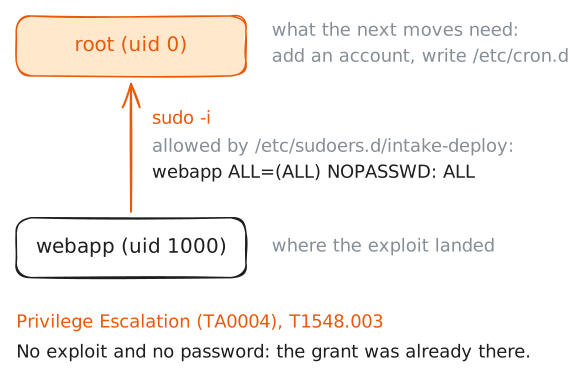
/etc/cron.d, reading other users' files) needs more than thewebappaccount the exploit landed./etc/passwdputwebappat uid 1000, not root. So before any of that, the attacker had to climb.Gaining a higher privilege level is the Privilege Escalation tactic. Here the path is a sudo misconfiguration: a release script left
webappa blanketNOPASSWD: ALLgrant in/etc/sudoers.d. Abusing a sudo rule to reach root is Abuse Elevation Control Mechanism: Sudo and Sudo Caching,T1548.003.Read the grant, then the two
sudolines in the history.intake:~# cat /etc/sudoers.d/intake-deploy intake:~# grep sudo /home/webapp/.bash_history
-
Two ways to stay: Persistence
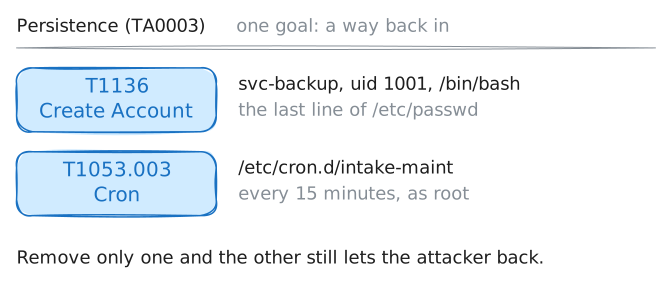
An attacker who loses the shell wants back in without re-exploiting anything. Keeping access is the Persistence tactic, and this intrusion set up two different techniques for it.
First, a new local account. As root, the attacker runs
useradd, and/etc/passwdends with asvc-backupline the clinic never created. Creating a login for persistence is a Create Account technique,T1136. You will pin its exact sub-technique in the practice tickets.Second, a scheduled job.
/etc/cron.d/intake-maintruns every 15 minutes as root. A cron job for persistence is Scheduled Task/Job: Cron,T1053.003.List the non-system accounts, then read the job.
intake:~# awk -F: '$3 >= 1000 {print $1, $3, $7}' /etc/passwd intake:~# cat /etc/cron.d/intake-maint -
Calling out, taking data, and the finished map
Three tactics close out the intrusion, all over the web, and they are the ones analysts most often mix up. One
curlpulls a tool down onto the host; one is the planted job's recurring check-in to a server the attacker owns; the last packages the clinic's records and ships them out.Pull the
curllines, then step back and read the whole map you have built.intake:~# grep curl /home/webapp/.bash_history
Run these steps on real machines