 Hack the Route Start learning Open app
The idea
Hana runs IT at Fenwick Logistics. She caught the dispatch laptop lp03 calling an address nobody knew, and saved an exact copy of the USB drive plugged into it. Make your own copy of hers that you could defend in court.
Steps
-
Why you never work on the original
The drive Hana pulled from
lp03is evidence. If anything you find leads to a dismissal or a court case, someone will ask whether you changed it.The moment you plug a drive into a running computer, the operating system wants to touch it: update a last-mounted time, drop a hidden index file, replay a journal. Each of those changes a byte, and a changed byte means you can no longer prove what was there when the drive was seized.
So a forensic examiner works two rules. First, a write blocker sits between the drive and the machine and refuses every write, so reading the original cannot change it. Second, you don't investigate the original at all: you make a full copy, seal the original away, and work only on the copy.
Hana already imaged the drive to a file,
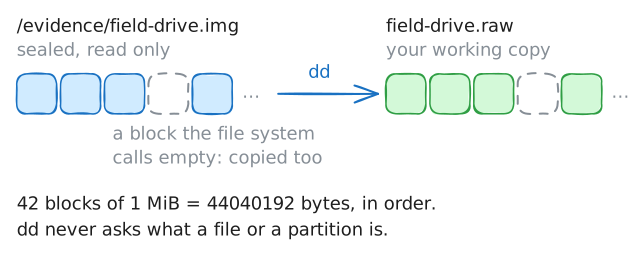
/evidence/field-drive.img, and that evidence locker is read only. Your job is to make your own working copy from it.dddoes the copy: it reads a source and writes a destination, block by block, with no idea what a file or a partition is. That is what you want here: every byte, in order, with nothing skipped and nothing added.Copy the image to a working file.
analyst:~# dd if=/evidence/field-drive.img of=field-drive.raw bs=1M
-
Prove the copy is identical
Here is the rule that makes digital evidence hold up: a copy is only evidence if you can prove it matches the original, and the proof is a cryptographic hash.
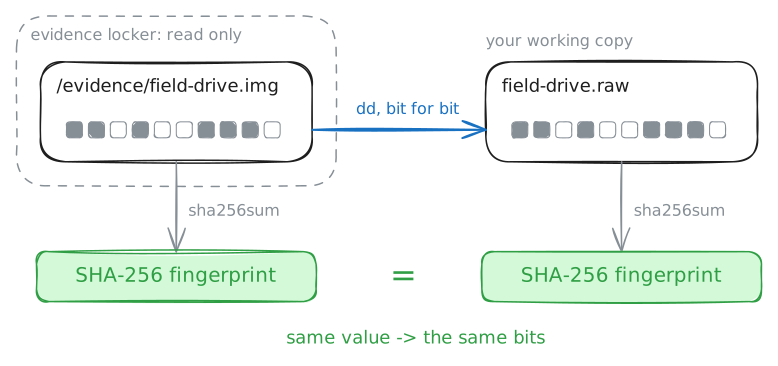
A hash function reads every byte of a file and boils it down to one short fingerprint (SHA-256 gives 64 hex characters). Two things make it useful. Change a single bit anywhere in the file and the fingerprint changes completely. And nobody has found a way to build a different file with the same SHA-256 fingerprint.
So if the original drive and your copy produce the same hash, they hold the same data, down to the last bit. If they ever differ, the hash shows it at once.
This is why whoever collects evidence records its hash on the spot. Hana wrote hers to
/evidence/SHA256SUMSwhen she imaged the drive. From then on, anyone can re-hash the evidence and compare: a match proves the chain of custody held and nothing was altered.Hash both files at once and read the two fingerprints.
analyst:~# sha256sum /evidence/field-drive.img field-drive.raw
-
Read the drive's map before you open it
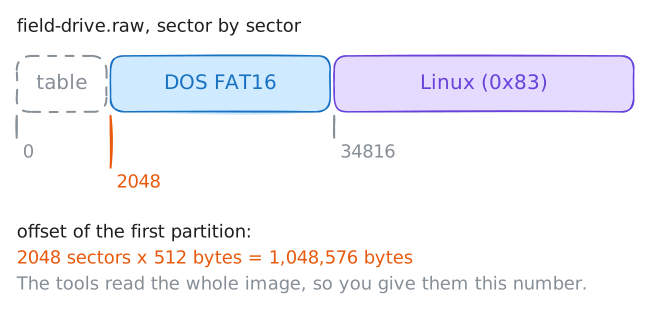
Your copy is one long run of bytes. A real drive is divided into partitions (separate areas, each usually holding its own file system), and a small table at the very front, the partition table, says where each one starts and how long it is.
You read that table before mounting anything, for two reasons. It tells you how many file systems are on the drive, so you investigate them all and miss nothing. And it gives you each partition's start, which you need as an offset: the tools work on the whole image, so you have to tell them how far in a partition begins.
mmlsfrom The Sleuth Kit prints the table straight from the image, without mounting it. Read the map.analyst:~# mmls field-drive.raw
-
Mount it read only, and try to break that rule
Now open the first partition to see its files, without giving the operating system any chance to change it.
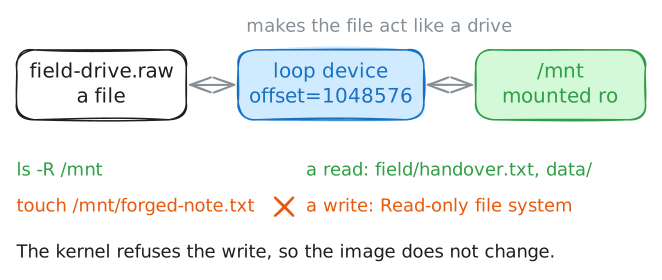
An image is a file, not a disk, so you attach it to a loop device, a kernel trick that makes a file behave like a drive.
mountdoes that and more in one command:-o loopattaches it,offset=skips to where the partition starts (the 1,048,576 bytes from the last step), andromounts it read only. Thatrois your software write blocker: the kernel refuses every write to the mount, so nothing, not you and not a background process, can alter the evidence.Mount it, list what is there, and then deliberately try to create a file on it to prove the block really holds.
analyst:~# sudo mount -o loop,ro,offset=1048576 field-drive.raw /mnt
analyst:~# ls -R /mnt
analyst:~# touch /mnt/forged-note.txt
analyst:~# sudo umount /mnt
Run these steps on real machines