 Hack the Route Start learning Open app
The idea
A vet practice keeps its patient records and its billing on one office network, next to a smart TV in the waiting room. Build a small zero trust architecture in front of them: a gate that asks every device who it is, on every request, and a policy that decides. Then find the way around the gate, and close it.
Steps
-
Through the gate
Willow Street Vets is a small practice with two apps: records, the patients' notes, and billing, the invoices. Everything shares one office network: Ines's laptop (she's a vet), Omar's (he does the accounts), and a smart TV in the waiting room.
The old way to protect apps like these is a wall around the office, and trust for anything inside it. That's the perimeter model, castle and moat. Its weak spot: one foothold inside, a hacked TV say, reaches everything.
Zero trust drops that. Being on the network earns nothing. Every request, to every app, has to show who's asking, and something has to decide, every time, whether that's allowed.
Two machines do that here.
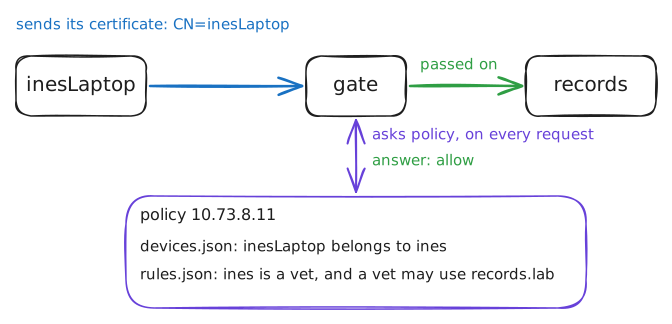
gateruns nginx, a web server, in front of both apps: the namesrecords.labandbilling.lablead to it, not to the apps. It's the policy enforcement point, the one holding the door.For each request,
gateaskspolicy, the policy engine. It decides from two files: a register of the practice's devices, and rules for who may use what.How does a device prove who it is, its identity? With a certificate, signed by the practice's certificate authority (CA). IT put one on each laptop, with its private key, a secret file that never leaves the laptop. Only the device holding the key can prove the certificate is its own.
Read Ines's certificate, then use it:
--certand--keyhandcurlthe certificate and the key.inesLaptop:~# openssl x509 -in /etc/ssl/lab/identity/certificate.pem -noout -subject -issuer -enddate inesLaptop:~# curl -s --cert /etc/ssl/lab/identity/certificate.pem --key /etc/ssl/lab/identity/key.pem https://records.lab/ inesLaptop:~# curl -sv -o /dev/null --cert /etc/ssl/lab/identity/certificate.pem --key /etc/ssl/lab/identity/key.pem https://records.lab/ policy:~# cat /var/log/policy.log
-
A device nobody enrolled
Now the TV in the waiting room. Nobody at the practice set it up: it came with the building's cable package, and it's plugged into the same network as the laptops. In the perimeter model, being on that network was the pass.
Ask the gate for the records from the TV. It has no certificate, so it can't send one.
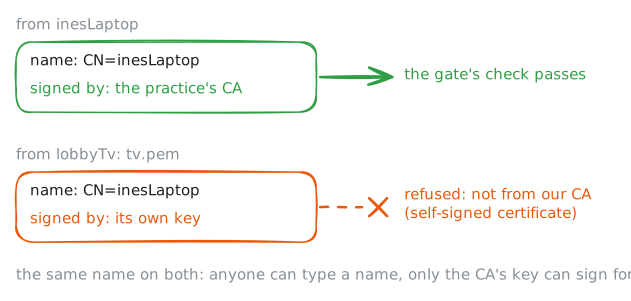
Then try harder. A certificate is a file, and anyone can make one.
openssl req -x509makes a self-signed certificate, one signed with its own key and vouched for by nobody else. Make one that claims to be Ines's laptop:-newkey ec -pkeyopt ec_paramgen_curve:P-256: make a new key, an elliptic-curve one, smaller than RSA for the same strength;-nodes: don't lock the key with a password;-keyoutand-out: where the key and the certificate go;-subj /CN=inesLaptop: the name to claim, the same as on Ines's certificate;-quiet: say as little as possible.
Hand the gate the made-up certificate and its key, the way the laptop did. Then read the gate's own config, to see how it treats a certificate.
lobbyTv:~# curl -s https://records.lab/
lobbyTv:~# openssl req -x509 -newkey ec -pkeyopt ec_paramgen_curve:P-256 -nodes -keyout tv-key.pem -out tv.pem -subj /CN=inesLaptop -quiet
lobbyTv:~# curl -s --cert tv.pem --key tv-key.pem https://records.lab/
gate:~# cat /etc/nginx/http.d/gate.conf
-
The way around the gate
The gate turned the TV away. But a gate only works if you have to go through it.
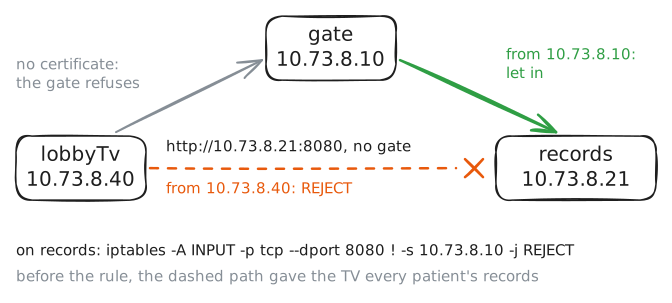
records.lableads to the gate, yet the app itself still listens at its own address,10.73.8.21, Port 8080, for anyone who asks. One scan of the network would find it.Try it from the TV: plain HTTP, straight to the app's address.
--max-time 3gives up after three seconds rather than waiting.Then read the app's own log on
records,/var/log/records.log. The app writes down the address of everyone it answers.This is the zero trust lesson that's easiest to miss: checks at a gate mean nothing if the gate can be skipped. So shrink who can reach each app at all. Only the gate needs to, so let only the gate.
That's microsegmentation: a Firewall rule around each app, in place of one wall around the whole office. It shrinks the implicit trust zone, the stretch where nothing gets checked, down to the one hop from the gate to the app.
Security+ calls the result threat scope reduction: if the TV is ever hacked, it can reach the gate, and nothing behind it.
On
records, add the rule withiptables, Linux's packet filter:-A INPUT: add a rule to the list for packets arriving here;-p tcp --dport 8080: TCP, to the app's port;! -s 10.73.8.10: from anywhere but the gate (!means "not");-j REJECT: turn them away, and say so.
lobbyTv:~# curl -s --max-time 3 http://10.73.8.21:8080/
records:~# cat /var/log/records.log
records:~# iptables -A INPUT -p tcp --dport 8080 ! -s 10.73.8.10 -j REJECT
lobbyTv:~# curl -sS --max-time 3 http://10.73.8.21:8080/
inesLaptop:~# curl -s --cert /etc/ssl/lab/identity/certificate.pem --key /etc/ssl/lab/identity/key.pem https://records.lab/
-
Only what the job needs
So far the question was who is this? That's authentication.
On every request, zero trust asks a second one: may they do this? That's authorization.
The answer should be as small as the job allows. That's least privilege.
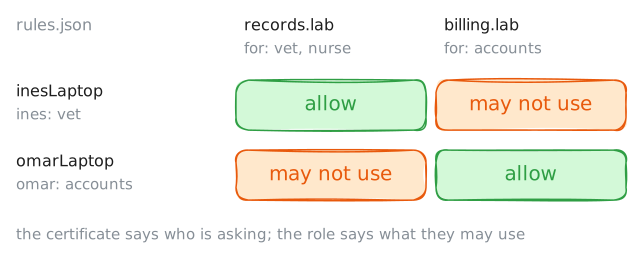
Ines is a vet: she needs the patients' notes, and has no reason to see what each owner paid. Omar does the accounts: billing, yes; the patients' notes, no. If Ines's laptop is ever taken over, least privilege is what keeps billing out of reach.
At Willow Street the answer lives in
/etc/policy/rules.json, onpolicy. It gives each person a role, and each app a list of roles that may use it.That's role-based access control, RBAC. When someone changes jobs, you change their role, and everything they may use changes with it.
Ask for billing from Ines's laptop, then from Omar's. Then ask for the records from Omar's, and read the rules.
inesLaptop:~# curl -s --cert /etc/ssl/lab/identity/certificate.pem --key /etc/ssl/lab/identity/key.pem https://billing.lab/
omarLaptop:~# curl -s --cert /etc/ssl/lab/identity/certificate.pem --key /etc/ssl/lab/identity/key.pem https://billing.lab/
omarLaptop:~# curl -s --cert /etc/ssl/lab/identity/certificate.pem --key /etc/ssl/lab/identity/key.pem https://records.lab/
policy:~# cat /etc/policy/rules.json
-
A laptop goes missing
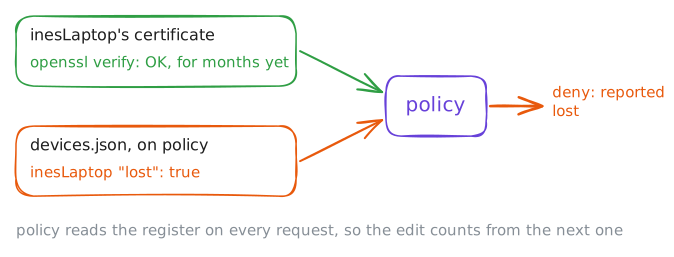
At lunch, someone breaks into Ines's car and takes her laptop. Its certificate and key are on the disk, and the certificate is good for months yet: the
notAfterfrom the first step.IT has two ways to take it back. The CA can revoke the certificate: add it to a published list of withdrawn ones, a CRL, or answer "revoked" when a server asks about it live, with OCSP. Either way, it stops only servers set up to check, and this gate isn't.
Or, since every request here goes through the policy engine, IT can tell the engine.
Ines rings IT, and IT marks the laptop lost in the device register,
/etc/policy/devices.jsononpolicy. The register is one of the policy engine's sources, what the practice knows about each device. Change it, and the engine's answers change with it.Mark it lost. Then play the thief: ask for the records from Ines's laptop.
Then check her certificate with
openssl verify:-CAfile: the practice's root CA, the one everything is checked against;-untrusted: the issuing CA from the first step, from the laptop'schain.pem. The root CA signed it, and "untrusted" means openssl checks that signature rather than taking it on faith.
Last, read the whole policy log.
inesLaptop:~# curl -s --cert /etc/ssl/lab/identity/certificate.pem --key /etc/ssl/lab/identity/key.pem https://records.lab/
inesLaptop:~# openssl verify -CAfile /usr/local/share/ca-certificates/lab-ca.crt -untrusted /etc/ssl/lab/identity/chain.pem /etc/ssl/lab/identity/certificate.pem
policy:~# cat /var/log/policy.log
Run these steps on real machines
Keep reading
- NIST SP 800-207, Zero Trust Architecture: where the policy engine, administrator and enforcement point come from article
- BeyondCorp: A New Approach to Enterprise Security, Google's paper on dropping the office perimeter article
- nginx's ssl_verify_client: how a server asks for a client certificate, and what optional_no_ca leaves to someone else article
- nginx's auth_request module: how a gate asks someone else before it lets a request through article